
As a developer, having the right tools can significantly enhance your productivity and coding efficiency.
GitHub CoPilot is one such tool, an AI-powered code completion assistant that can help you write code faster and with fewer errors.
If you’re using Visual Studio, integrating CoPilot can be a game-changer for your development process.
In this guide, we will take you through a step-by-step process on how to install CoPilot in Visual Studio, version compatibility, pre-requisite, system requirements, GitHub pilot chat, and so on.
Whether you’re new to CoPilot or looking to revamp your setup.
After this, you can start leveraging its powerful features in no time.
At AIUtilityTools, we cover in-depth AI Tools & Software & Developer, feel free to check out.
Github CoPilot
GitHub Copilot is a developer-friendly tool that utilizes artificial intelligence to accelerate and optimize coding processes.
It offers features like suggesting code completions, generating snippets, and even composing entire functions based on contextual cues.
Github Copilot supports multiple languages and frameworks, and it adapts to your coding style and preferences by learning from your codebase.
Bruno Capuano demonstrates how to seamlessly integrate GitHub Copilot into Visual Studio, which supports a wide array of programming languages including C#, VB.NET, C++, Python, and more.
This integration empowers developers to harness AI capabilities, thereby enhancing coding efficiency and productivity significantly.
The Benefit of Using CoPilot With Visual Studio
Using Copilot with Visual Studio has really some strong benefits, so I recommend integrating these AI tools with the editor to enhance coding efficiency and productivity.
Installing CoPilot with Visual Studio empowers developers to write code more efficiently, learn new technologies faster, and maintain higher coding standards, thereby enhancing overall development productivity.
👉🏼 Advanced Code Completion: CoPilot provides intelligent suggestions for completing code snippets based on context. This can speed up coding by reducing the need to manually write repetitive or boilerplate code.
👉🏼 Enhanced Code Refactoring: It offers recommendations for refactoring existing code, making it easier to improve code structure, readability, and maintainability.
👉🏼 Exploring New Concepts: CoPilot can assist in exploring new libraries, frameworks, or programming paradigms by providing examples and explanations, which is particularly useful for learning and adopting new technologies.
👉🏼 Time Savings: By automating repetitive coding tasks and providing accurate suggestions, CoPilot helps developers save time during development cycles.
👉🏼 Reduced Errors: Its ability to generate accurate code based on context and best practices helps reduce common coding errors and improves code quality.
👉🏼 Personalized Assistance: CoPilot can adapt to your coding style and preferences over time, offering increasingly relevant suggestions and improving productivity as you use it more.
👉🏼 Support for Complex Tasks: It assists in handling complex coding tasks that require extensive research or involve multiple steps, streamlining the development process.
👉🏼 Integration Flexibility: Depending on the plugin or integration method used, CoPilot can seamlessly integrate into Visual Studio’s IDE environment, providing a familiar and integrated experience for developers.
Pre-Requisites & System Requirements To Install CoPilot In Visual Studio
To install and use CoPilot in Visual Studio, you’ll need to consider the following prerequisites and system requirements:
System Requirements:
⭕ Visual Studio Version: Make sure that you have a compatible version of Visual Studio. CoPilot plugins or integrations may specify compatibility with specific versions, so check the plugin’s documentation or requirements.
⭕ Operating System: CoPilot and Visual Studio support major operating systems like Windows, macOS, and sometimes Linux. Verify compatibility with your specific OS version.
⭕ Hardware Requirements: Make sure that your system meets the minimum hardware specifications for running Visual Studio smoothly, as CoPilot will operate within this environment.
Required Software and Tools
⭕ CoPilot Plugin or Integration: Depending on how CoPilot is integrated into Visual Studio, you may need to install:
⭕ Official Copilot Plugin: Check if there’s an official CoPilot plugin available in the Visual Studio Marketplace or through OpenAI’s official channels.
⭕ Third-Party Plugin: If using a third-party integration, follow the installation instructions provided on their website or documentation.
⭕ API Keys or Authentication: Some CoPilot integrations may require API keys or authentication tokens for access to OpenAI’s GPT models. Check that you have these credentials ready if necessary.
⭕ Internet Connectivity: CoPilot requires an internet connection to access cloud-based models and provide real-time suggestions. Make sure your system has reliable internet connectivity during use.
⭕ Configuration Settings: Depending on the plugin or integration method, you may need to configure settings within Visual Studio to optimize CoPilot’s behavior, such as auto-insertion of suggestions or specific coding styles.
How To Install CoPilot In Visual Studio Step By Step?
Following these steps will enable GitHub Copilot within Visual Studio, allowing you to start utilizing its AI-powered coding assistance features to enhance your development workflow.
Here are the steps on how to install Copilot in Visual Studio step by step-
1️⃣ Open Visual Studio: Launch Visual Studio on your computer.
2️⃣ Access Extensions and Updates: Navigate to the “Extensions” menu and select “Manage Extensions” or “Extensions and Updates” from the dropdown.
3️⃣ Search for CoPilot in Visual Studio Marketplace: In the Extensions window, click on the “Online” or “Visual Studio Marketplace” tab. Use the search bar to look for “GitHub Copilot”.
4️⃣ Install CoPilot: Once you find GitHub Copilot in the search results, click on “Download” or “Install” to begin the installation process.
5️⃣ Restart Visual Studio: After installation completes, Visual Studio may prompt you to restart the application. Follow any on-screen instructions to restart Visual Studio to finalize the installation.
Installing Github Copilot For Visual Studio 2022 Version 17.10 or Later
The below approach ensures that GitHub Copilot, along with GitHub Copilot Chat, is integrated into Visual Studio 2022 version 17.10 or later, providing enhanced coding assistance through a unified extension package.
To acquire GitHub Copilot for Visual Studio 2022 version 17.10 or later, follow the steps discussed below:
1️⃣ Install Visual Studio 2022 version 17.10 or Later: Check that you have Visual Studio 2022 version 17.10 or a more recent version installed on your system.
2️⃣ Select Workloads in the Installer
3️⃣ Unlock the Visual Studio Installer.
4️⃣ Choose to install at least one workload. During the installation process, GitHub Copilot should be preselected as part of the default components.
5️⃣ If no workload is initially selected, you can still install GitHub Copilot separately. Navigate to “Individual components” in the installer and select GitHub Copilot.
6️⃣ Installation Confirmation
GitHub Copilot is included by default with all selected workloads. If you opt not to include it during the initial installation, you can add it later using the Visual Studio Installer.
To do so, modify your existing installation through the Visual Studio Installer and select the GitHub Copilot component from the list of available components.
Installing Github Copilot For Visual Studio 2022 Version 17.8 to 17.9
To install GitHub Copilot for Visual Studio 2022 versions 17.8 to 17.9, where GitHub Copilot and GitHub Copilot Chat are available as separate extensions, then you need to follow these steps below-
🟢 Using the Visual Studio Installer (Recommended):
🟢 Open the Visual Studio Installer on your system.
🟢 Navigate to the “Individual components” tab.
🟢 Search for “GitHub Copilot” in the list of available components.
🟢 Check the box next to GitHub Copilot to select it for installation.
🟢 Click on the “Install” button to begin the installation process.
Using the Extension Manager:
🟢 Open Visual Studio.
🟢 Go to the “Extensions” menu.
🟢 Choose “Manage Extensions” or “Extensions and Updates”.
🟢 In the Extensions window, switch to the “Online” or “Visual Studio Marketplace” tab.
🟢 Search for “GitHub Copilot”.
🟢 Select GitHub Copilot from the search results and click on “Download” or “Install”.
Installing from Visual Studio Marketplace:
🟢 Visit the Visual Studio Marketplace website: GitHub Copilot on Marketplace.
🟢 Click on the “Download” button or follow the instructions to install GitHub Copilot directly into Visual Studio.
Difference Between GitHub Copilot And GitHub Copilot Chat
GitHub Copilot focuses on enhancing coding efficiency through AI-generated code suggestions, GitHub Copilot Chat serves as a conversational tool for general inquiries and guidance related to coding and GitHub usage.
Let’s see how.
GitHub Copilot
👉🏼 Purpose: GitHub Copilot is an AI-powered code assistant that helps developers write code faster and smarter.
👉🏼 Functionality: It suggests code completions, generates code snippets, and can even write entire functions based on context and patterns learned from vast code repositories.
👉🏼 Integration: GitHub Copilot integrates directly into code editors like Visual Studio Code and JetBrains IDEs, providing real-time coding assistance across various programming languages and frameworks.
👉🏼 Usage: It is primarily used for enhancing coding productivity and learning new coding techniques through AI-generated suggestions and examples.
GitHub Copilot Chat
👉🏼 Purpose: GitHub Copilot Chat is designed as a conversational AI tool aimed at assisting users with general inquiries, providing information, and offering guidance.
👉🏼 Functionality: It operates similarly to a chatbot, responding to queries with information, explanations, and recommendations.
👉🏼 Platform: GitHub Copilot Chat may be accessible through platforms like GitHub discussions, providing a way for users to interact with AI-generated responses.
👉🏼 Usage: It is useful for answering questions, providing explanations, and guiding users through various topics related to coding, software development, and GitHub-related inquiries.
How To Instal GitHub Copilot Chat?
Below you follow the steps, make sure you have fulfilled the prerequisites-
Prerequisites:
Have Visual Studio installed on your system. GitHub Copilot Chat is generally available as an extension within Visual Studio, so having Visual Studio ready is essential.
To install GitHub Copilot Chat, follow these steps:
Installation Steps:
✅ Open Visual Studio:
- Launch Visual Studio on your computer.
✅ Access Extensions:
- Go to the “Extensions” menu in Visual Studio.
✅ Manage Extensions:
- Select “Manage Extensions” or “Extensions and Updates” from the dropdown menu. This will open the Extensions window.
✅ Search for GitHub Copilot Chat:
- In the Extensions window, switch to the “Online” or “Visual Studio Marketplace” tab.
- Use the search bar to look for “GitHub Copilot Chat”.
✅ Install GitHub Copilot Chat:
- Once you find GitHub Copilot Chat in the search results, click on “Download” or “Install” to begin the installation process.
✅ Follow Installation Prompts:
- Follow any on-screen prompts to complete the installation of GitHub Copilot Chat.
✅ Restart Visual Studio (if required):
- After installation, Visual Studio may prompt you to restart the application to finalize the installation of GitHub Copilot Chat. Follow these instructions to ensure the extension is properly activated.
✅ Verify Installation:
- After restarting Visual Studio, verify that GitHub Copilot Chat is active and accessible. You may find it under the Extensions menu or within the toolbar, depending on how it integrates with Visual Studio’s interface.
Once Install, Check The Copilot States
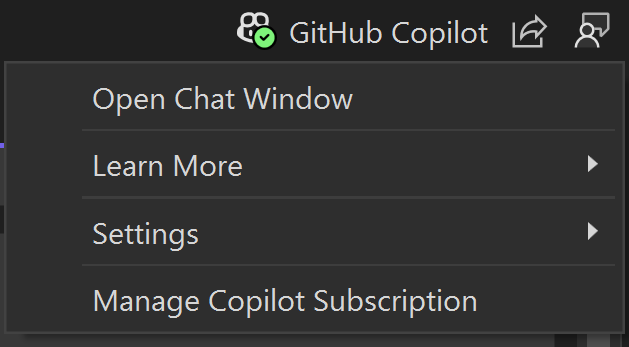
In Visual Studio 2022 version 17.10, a Copilot status icon appears in the upper-right corner of the environment, indicating whether Copilot is active, inactive, unavailable, or not installed.
You can use the dropdown menu from this icon to access various options for managing or troubleshooting your Copilot status. Depending on the current state of Copilot, certain options may be available or greyed out.
Check If Copilot Is Active…
If Copilot is active and fully operational, it means you’ve signed into Visual Studio using a GitHub account with an active subscription to either GitHub Copilot for Individuals or GitHub Copilot for Business.
You can use the dropdown menu to effortlessly open the Chat window, adjust Copilot settings, and manage your Copilot subscription.
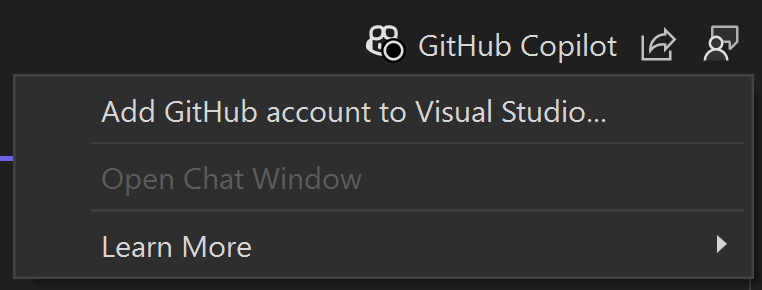
Check If Copilot Is Inactive…
If Copilot is installed but inactive, it could be due to the following reasons:
- You haven’t signed into Visual Studio with a GitHub account yet.
- Your signed-in GitHub account lacks an active subscription to Copilot.
To resolve this, select “Add GitHub Account with a Copilot Subscription” from the dropdown menu of the status icon.
This action opens the Account Settings where you can sign in using a GitHub account that has an active Copilot subscription. Once signed in, the Copilot status icon will update to indicate an active state.
If Copilot is inactive because your signed-in GitHub account credentials need to be refreshed, you can select “Refresh your GitHub credentials” from the dropdown menu.
This option allows you to update your GitHub account credentials and sign in again.
If Copilot is disabled by your administrator, please contact your IT administrator to learn more.
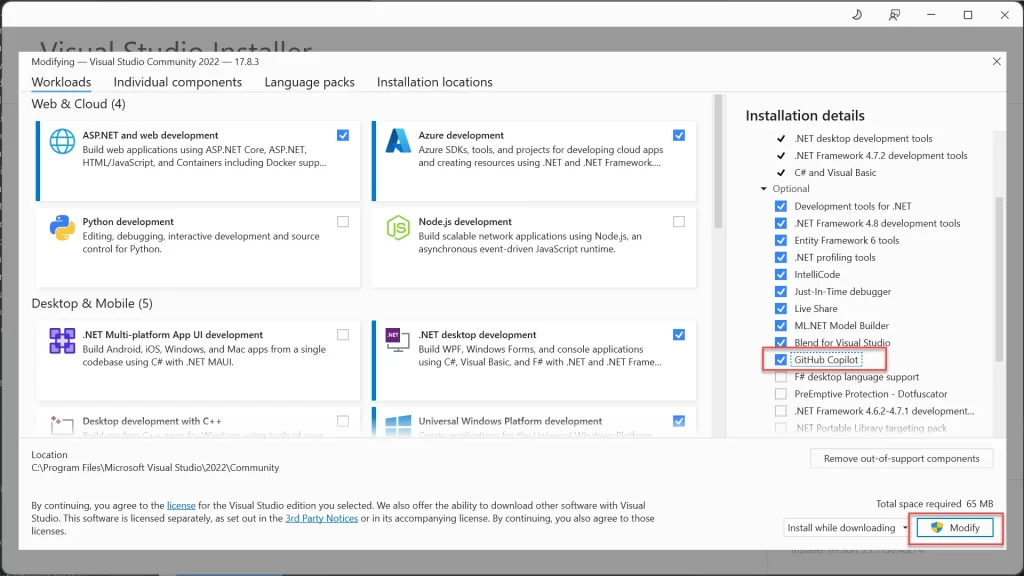
Install using the Visual Studio Installer
🟢 Open the Visual Studio Installer.
🟢 Choose the Visual Studio installation you wish to modify, then click on Modify.
🟢 Select a workload, such as .NET desktop development.
🟢 Locate GitHub Copilot in the list of Optional components, then click Modify to proceed with installing the extension.
FAQs Related To How To Install CoPilot In Visual Studio
What is GitHub CoPilot?
GitHub CoPilot is an AI-powered code completion tool that assists developers by suggesting whole lines or blocks of code as they type.
What are the system requirements for installing CoPilot in Visual Studio?
CoPilot requires Visual Studio 2019 or later. It is compatible with Windows and macOS operating systems.
How do I access the Visual Studio Marketplace to install CoPilot?
Open Visual Studio, go to the Extensions menu and select Manage Extensions. From there, you can search for GitHub CoPilot in the Visual Studio Marketplace.
Is there a cost associated with using GitHub CoPilot?
GitHub CoPilot is available through a subscription model. GitHub offers a free trial period, after which a monthly or annual fee is required.
Do I need a GitHub account to use CoPilot?
Yes, you need a GitHub account to use CoPilot. You will be prompted to sign in to your GitHub account during the installation process.
Can I use GitHub CoPilot with any programming language in Visual Studio?
GitHub CoPilot supports a wide range of programming languages, including Python, JavaScript, TypeScript, Ruby, Go, and more. However, its performance may vary depending on the language and context.
How do I enable or disable GitHub CoPilot after installation?
You can enable or disable GitHub CoPilot from the Visual Studio Extensions menu. Navigate to the CoPilot extension and adjust the settings as needed.
What should I do if I encounter issues during installation?
Ensure that your Visual Studio is updated to the latest version. Check your internet connection and GitHub account status. If problems persist, consult the GitHub CoPilot documentation or seek support from the GitHub community.
Can I customize the behavior of GitHub CoPilot?
Yes, you can customize various settings of GitHub CoPilot, including suggestion behavior, language preferences, and more through the CoPilot settings in Visual Studio.
How do I update GitHub CoPilot in Visual Studio?
Updates for CoPilot can be managed through the Visual Studio Extensions menu. Check for updates regularly to ensure you have the latest features and improvements.
Is GitHub CoPilot available for Visual Studio Code as well?
Yes, GitHub CoPilot is available for both Visual Studio and Visual Studio Code. The installation process is similar but tailored to each environment.
How do I uninstall GitHub CoPilot from Visual Studio?
To uninstall CoPilot, go to the Extensions menu in Visual Studio, select Manage Extensions, find GitHub CoPilot, and click Uninstall. Restart Visual Studio to complete the uninstallation process.